To properly check if your PC power supply unit (PSU) is functioning correctly, you can use the following methods:
1. Visual Inspection and Preparation
- Power Off and Unplug the System: Before doing anything, turn off the PC and unplug it from the wall to ensure safety.
- Inspect the PSU: Check for any physical signs of damage like burn marks, bulging capacitors, or a burnt smell. Also, ensure the fan on the PSU is spinning freely.
2. Testing with a Multimeter
- This method allows you to measure the voltage coming from each of the PSU connectors to verify they are within specification.
Steps to Test with a Multimeter:
- Turn Off and Disconnect:
- Power down your PC and disconnect the PSU cables from all internal components.
- Prepare the PSU:
- Plug the PSU into a power outlet.
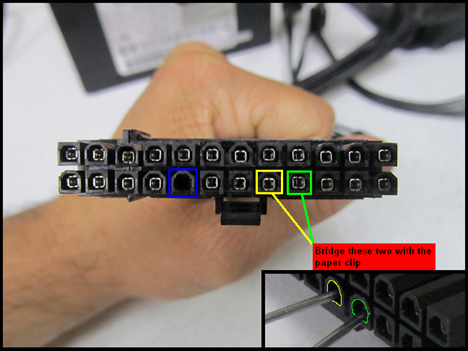
- Short the green wire (PS_ON) on the 24-pin connector with any of the black wires using a paperclip. This will power on the PSU without a motherboard.
- Turn On the PSU:
- Turn on the switch on the back of the PSU if there is one. You should hear the fan start running.
- Measure Voltages:
- Set your multimeter to DC voltage mode.
- Test the different pins on the connectors:
- Yellow wires should give +12V.
- Red wires should give +5V.
- Orange wires should give +3.3V.
- Black wires are ground.
- Check the 24-pin connector, CPU connector, SATA connectors, and any PCIe connectors.
- Verify Values:
- Tolerances are typically ±5%. For example:
- +12V rail should be between 11.4V and 12.6V.
- +5V rail should be between 4.75V and 5.25V.
- +3.3V rail should be between 3.135V and 3.465V.
- Tolerances are typically ±5%. For example:
3. Using a PSU Tester
- A PSU Tester is a more convenient and safer way to test the PSU.
- Steps:
- Plug the 24-pin Connector: Connect the 24-pin ATX power connector to the PSU tester.
- Plug the Other Cables: Connect additional connectors like the CPU 4/8-pin or PCIe power connector if required.
- Power On: Turn on the PSU. The tester will show voltage readings and indicate any errors if the output is outside acceptable ranges.
4. Cross-Test with Another System
- If you suspect the PSU is faulty but don’t have the tools to test it directly, you can try using the PSU in another known working system. Alternatively, use a known good PSU to power your current system to see if the issues persist.
5. Check with the Paperclip Test
- This is a basic test to see if the PSU fan turns on and can indicate if the PSU is completely dead. However, it doesn’t confirm the health of the PSU under load.
Steps:
- Unplug the PSU from the Motherboard.
- Short the Green Wire to a Black Wire on the 24-pin connector using a paperclip.
- Turn On the PSU. If the fan starts spinning, the PSU is at least powering on, but this doesn’t mean it is delivering stable voltage or working under load.
6. Listen for Unusual Noises
- Power on the PSU and listen for any clicking, grinding, or other unusual noises from the fan, which may indicate a problem.
7. Monitor System Stability
- When connected to the PC, issues like random shutdowns, reboots, or system freezes can indicate a faulty PSU that is unable to supply consistent power, especially under load.
Safety Considerations
- Avoid Testing with the PSU Open: A PSU contains capacitors that can hold a charge even when unplugged, which can be dangerous.
- Always use appropriate tools like a multimeter or PSU tester and avoid direct contact with the internals.
Testing a PSU with these methods will help determine if it’s operating correctly or if it needs to be replaced. If the voltage levels are outside the tolerance range or the PSU fails to power on consistently, it is likely faulty and should be replaced.


