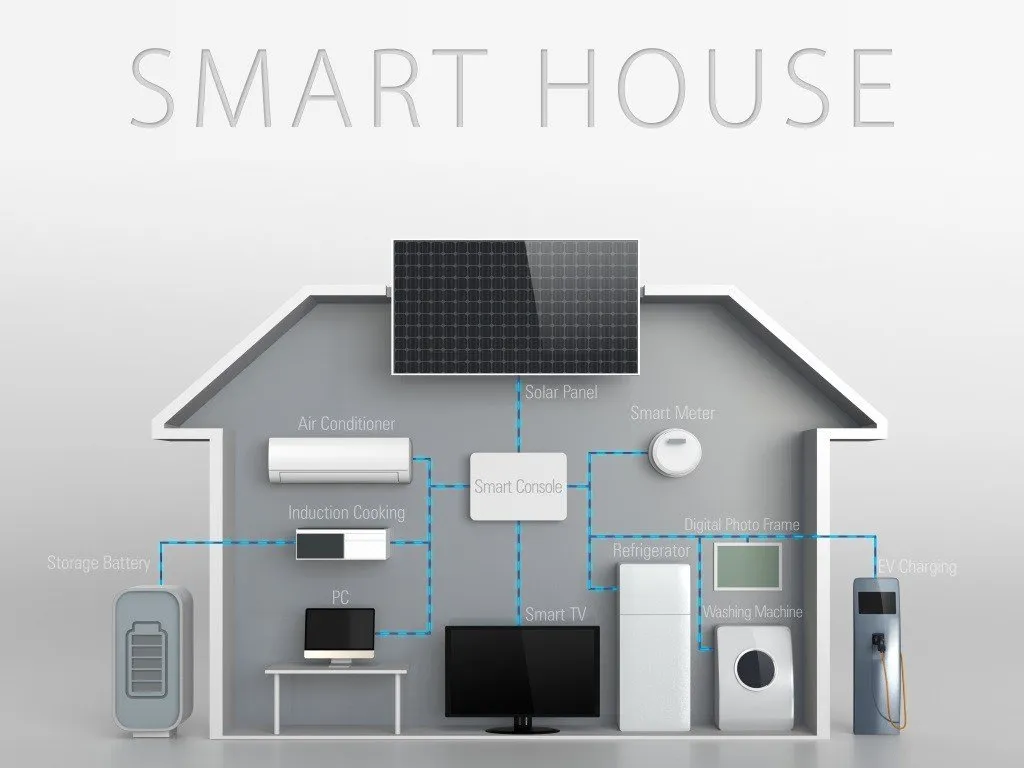
Setting up a DIY smart home allows you to automate and control various aspects of your home to improve convenience, security, comfort, and energy efficiency. With the growing availability of affordable and easy-to-install smart devices, you don’t need to be an expert to create a connected home. Whether you’re a tech enthusiast or a beginner, a DIY smart home setup can be a rewarding and fun project.
Here’s everything you need to know about setting up your own DIY smart home:
1. Plan Your Smart Home Ecosystem
- Define Your Goals: Before buying any devices, think about what you want your smart home to accomplish. Is it about improving security, increasing energy efficiency, automating tasks, or all of the above? Defining your goals will help you prioritize the devices that best fit your needs.
- Choose a Platform: Most smart devices are compatible with major ecosystems, such as Amazon Alexa, Google Assistant, or Apple HomeKit. Choose a platform that suits your preferences and ensures compatibility with the devices you plan to purchase.
2. Essential Smart Devices for Your DIY Smart Home
Here’s a list of the essential devices you might want to start with. You can add more devices over time as you expand your smart home:
Smart Hub (Optional)
- Examples: Samsung SmartThings Hub, Amazon Echo, Google Nest Hub.
- What It Does: A smart hub acts as the central controller for your connected devices. It allows communication between devices, even if they come from different manufacturers. Some hubs also provide automation capabilities and can serve as a home assistant.
Smart Lights
- Examples: Philips Hue, LIFX, TP-Link Kasa Smart Bulbs.
- What They Do: Smart bulbs allow you to control your lighting remotely, set schedules, and even adjust brightness and color.
- DIY Setup Tips: Install smart bulbs in common areas like the living room or kitchen. Pair them with motion sensors to automatically turn on or off when someone enters or leaves the room.
Smart Thermostat
- Examples: Nest Learning Thermostat, Ecobee SmartThermostat.
- What It Does: A smart thermostat helps optimize your home’s heating and cooling, automatically adjusting the temperature based on your habits or the time of day. It can save energy by reducing usage when you’re away or asleep.
- DIY Setup Tips: Install the thermostat in a central location. Connect it to your Wi-Fi network and sync it with your smart assistant for remote control.
Smart Plugs
- Examples: TP-Link Kasa Smart Plug, Wemo Insight Smart Plug.
- What They Do: These plugs let you control devices like lamps, coffee makers, and fans remotely.
- DIY Setup Tips: Plug them into standard outlets and connect to your Wi-Fi. You can also schedule appliances to turn on and off automatically, such as setting up a coffee maker to brew in the morning.
Smart Cameras & Doorbells
- Examples: Ring Video Doorbell, Arlo Pro 4, Nest Cam.
- What They Do: These devices provide video surveillance, sending real-time alerts to your phone if they detect motion or when someone rings the doorbell.
- DIY Setup Tips: Install cameras at key entry points like the front door, back door, or driveway. Connect them to your Wi-Fi and sync them with your smart assistant for voice alerts or streaming.
Smart Locks
- Examples: August Smart Lock, Schlage Encode, Yale Assure Lock.
- What It Does: A smart lock allows you to lock or unlock doors remotely, grant access to others, and track who enters and leaves your home.
- DIY Setup Tips: Install the lock on your front or back door. Pair it with your phone or smart hub to unlock the door remotely.
Smart Sensors
- Examples: Samsung SmartThings Motion Sensor, Ring Alarm Motion Sensor.
- What They Do: Motion and contact sensors detect activity or changes in your environment (e.g., doors opening or movement in a room).
- DIY Setup Tips: Position sensors near entryways or in rooms where you want extra security. Link them with other devices like lights, cameras, or alarms for automated responses to triggers.
3. Set Up Home Automation
- Automation is one of the most powerful features of a smart home. It allows you to create routines that automatically control your devices based on conditions like time of day, location, or sensor activity.
Example Automations:
- Morning Routine: Set your thermostat to heat the home in the morning, turn on the coffee maker, and adjust your lights to a bright setting when you wake up.
- Away Mode: Automatically turn off lights, lock doors, and arm your security cameras when you leave the house.
- Night Mode: Schedule lights to dim or turn off when you go to bed, and adjust the thermostat to a comfortable sleeping temperature.
DIY Setup Tips:
- Use the apps for your devices (Amazon Alexa, Google Home, or the manufacturer’s app) to create automation routines.
- If you’re using a smart hub (like SmartThings), you can create more advanced automations that integrate multiple devices, such as turning on lights and adjusting the thermostat when motion is detected in the hallway.
4. Voice Control and Smart Assistants
- Smart assistants like Amazon Alexa, Google Assistant, or Apple Siri are essential for a fully hands-free smart home experience. You can control your devices by voice commands, such as asking Alexa to lock the door or telling Google to dim the lights.
DIY Setup Tips:
- Choose a voice assistant that fits your ecosystem (Amazon for Alexa, Google for Google Home, Apple for HomeKit).
- Place smart speakers or displays in central locations to ensure the voice assistant can hear and respond to your commands easily.
5. Secure Your Smart Home
- Security is a top priority when setting up any smart home. Many devices, especially cameras, doorbells, and locks, can be vulnerable to hacking if not properly secured.
DIY Security Tips:
- Use Strong Passwords: Ensure all smart devices are protected by strong, unique passwords.
- Enable Two-Factor Authentication (2FA): For devices and apps that support it, enable 2FA for an extra layer of protection.
- Regular Updates: Keep your devices up to date with the latest security patches and firmware updates from the manufacturers.
- Separate Networks: If possible, set up a dedicated Wi-Fi network for your smart home devices to prevent hackers from gaining access through your main network.
6. Expand Your Setup Over Time
- One of the advantages of DIY smart home setups is flexibility. You don’t have to install everything all at once. Start with a few key devices and gradually expand based on your needs and budget.
Additional Devices You Can Add Later:
- Smart Speakers: Enhance your home with Alexa or Google Assistant devices for music, reminders, and more.
- Smart Blinds and Shades: Automate your window treatments to regulate light and temperature.
- Smart Appliances: Upgrade to a smart fridge, washing machine, or oven for added convenience and efficiency.
- Smart Smoke/Carbon Monoxide Detectors: Add safety features that notify you of hazards even when you’re away.
7. Troubleshooting and Maintenance
- As you set up your smart home, there will likely be moments where devices don’t connect or functions don’t work as expected. Here are some common troubleshooting steps:
- Check Wi-Fi: Ensure that your Wi-Fi signal is strong enough to support multiple devices.
- Reboot Devices: Power cycle your smart devices or your router if you experience connectivity issues.
- Check Firmware: Make sure your devices are running the latest firmware for optimal performance and security.
- Use Device Support: Each device typically comes with customer support, FAQs, and troubleshooting guides in case you encounter issues.
Conclusion
Building your own DIY smart home is an exciting and empowering project. By planning your setup, choosing the right devices, and automating processes, you can create a highly functional and efficient home. While there’s a learning curve, most smart devices today are easy to install and can be controlled via simple apps and voice assistants. Start small, expand over time, and enjoy the enhanced comfort, security, and energy efficiency that come with your smart home setup!


